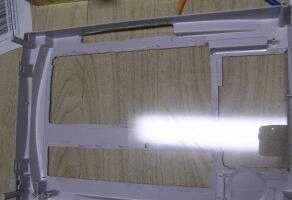
That's the original thing. This picture was taken on April 22, 2003, and the project
was finally finished sometime in August of 2004, so that gives you an idea of how long
this thing's been sitting around doing nothing. |
|

I know this isn't a great picture, but it was just a part of a larger picture of
various junk I had for sale. It offers a little view of the inside of the scanner. |
I didn't think to take any pictures of the scanner during its
first gutting; if you've ever seen the inside of a scanner, then you've seen
them all. I took the inverter and the CCFL bulb and stashed them aside for
later.
Early on I realized that the raised plastic inside the casing would make just
about any expansion card an impossibility. Since this was originally intended to
act as a Linux-based router, it'd need another NIC installed. So the plastic on
the bottom had to go.

The bottom of the case wasn't easily accessible with the rather fat tip of
the Dremel; the Flexshaft made this task possible. |
|

Some time later, this was the result - the raised portions were sliced out, as was a
small area where the back panel connectors would go. |

There's the base placement at the front-left. Some of the casing was ground away too
to make room for the motherboard. I apologize for the bad focus here. These pictures
were taken before I had a camera with macro mode.
|
|

This is the front-right. Unfortunately, the corner of the motherboard needed
to go here, so this hole needed to be made. Not the most elegant solution,
but it works, and it wasn't really very visible when the project was
completed. |
|
|

This was an idea very early on for placement of a few components. Yes,
that board in the back is the power supply. There was no way I was going
to get a whole ATX PSU in there, so out came the board itself. However,
this didn't seem to leave any good place for the other components -
floppy, hard drive, and CD-ROM.
|
|

After some rearranging and some creative slicing of a conveniently-placed ridge of
plastic, which for some lucky reason I didn't slice out in the first place...
|
|

And some "careful" measuring for the floppy drive's mounting holes...
|
|

And yet another slice in the back of the scanner... |
|
|

I figured out the final arrangement of components. That is a laptop CD drive you see there.
A desktop CD drive simply could not be made to fit anywhere; the tray and its associated
gears and motors just took up too much room.
|
|

I needed an adaptor though to hook a slimline drive to a standard IDE
connector.
|
|

And here it is - IDE connector, floppy-drive power connector,
and two header sets for audio output.
|

On the sides of the drive are mounted some custom brackets I sliced from the ATX
power supply's now-unused casing.
|
|

I had wanted a window in the CD drive, but as the project drug on, I realized it would
take too much additional time to cut out a real window. This is a piece of thin plastic
with epoxy around it, over an existing hole. Sophisticated solution, no?
|


