Secondary Coil
This is the part of the Tesla Coil that people usually
remember seeing. It is a coil of wire wrapped around a tube. The
sparks come from the top of this.
For this section, you will need the following items:
1. A 12 inch length of a 3 1/2"
diameter cardboard tube; the width of the walls of the tube
should be 5/16" or thinner.
2. Some sort of plastic cap that can be used to close the
cardboard tube temporarily.
3. One quart of polyurethane varnish, and some 1-inch wide
paintbrushes. The varnish MUST NOT be water based. It has to be
polyurethane or oil based. (paint thinner is very useful for
cleaning the brushes). Fiberglass resin may be used instead of
varnish. It is thicker and will require fewer coats.
4. About 700 continuous feet of 24 to 26 gauge enameled magnet
wire on a plastic reel. This will weigh a little under a pound.
The reel should have a hole through the center of it. This will
come in handy for use with the winding rig explained below.
5. Two plastic discs that can be used to close each end of the
tube. They must be 3 1/2" in diameter,
and about 1/4" thick.
6. Two rubber bands that will fit tightly around the tube.
7. A wooden wheel about 2 inches wide. It should have a hole
through the middle. You will also need a small roll of aluminum
tape.
8. A 6-inch section of a wooden dowel. The dowel must fit snugly
into the hole in the wooden wheel.
Coat the outside of the tube with polyurethane varnish. I coated
the outside 7 times with varnish, allowing it to dry between
coats. The inside must also be varnished. To do this, I capped
one end and simply poured varnish into the tube. When you do this,
make sure that the cap is as water-tight as possible. I lined the
edges of it with duct tape, and this worked very well. Spread
newspaper before doing this, in case some varnish does leak out.
I turned the tube slowly to cause the varnish to coat the ENTIRE
inside of the tube. Leave the tube dry thoroughly. It is critical
that the tube is nearly saturated with varnish.
When you are not busy varnishing the tube, you can begin
construction of a simple winding device.
You will need the following for the winding rig:
1. A cardboard box about 1 1/2' x 1/2'
x 2'.
2. A wooden dowel that will fit through the hole in the reel of
wire. It should be thicker than 1/4",
and less than 3 feet long.
To assemble it, push a dowel through one side of a box. Then push
it through the middle of the reel of wire, and then through the
other side of the box. The front of the box should be cut out.
This configuration allows the reel to spin freely.
You can then begin winding with the 24 gauge wire. The winding
should start about 1/2" inch from the
end of the tube, and should be parallel to the end. Leave a foot
of wire before you start winding. When you start winding, use
some hot glue to secure the first turn in place. The turns should
be wound right next to each other, as well as tight on the
cardboard tube. As you wind, place a dab of hot glue every 15 to
25 turns. This is 'insurance' in case you slip and the wire
loosens up on the coil. This way, the rest of the coil would not
be affected by this. Make sure that the wire does not overlap.
Once the coil has been wound, the final turn can be secured in
place by a few dabs of hot glue. What you should now have is a
coil that is tightly wound with wire, all except for 1/2"
on either end. It now needs to be coated with varnish. You can
use the same varnish that you coated the cardboard tube with.
Right before you are ready to varnish it, remove all of the dabs
of hot glue, except for one or two that will hold the end turns
in place. Do not coat the tube lengthwise, as this will form
small air bubbles, which can greatly decrease the coil's
performance, and possibly damage the secondary coil. You should
coat the coil at least 20, yes I do mean twenty, times. This
improves the coil's performance, and it keeps the turns of wire
from loosening up. It also keeps out all moisture. If 20 coats of
varnish is too much for you (who can blame you) I have heard that
fiberglass resin is more efficient to apply. It is thicker and
should only need about 3-5 coats.
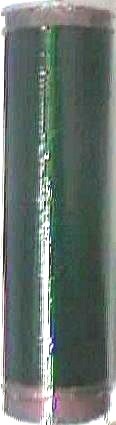
This is what the coil
should now look like.
Take one of the plastic discs, and drill a hole in the middle of
one. The hole must be wide enough to allow the wooden dowel to
fit in snugly.
Once the varnish has completely dried, put epoxy on the ends of
the secondary coil tube, and put one plastic disc on each end.
Make sure that there is no wire on the inside of the coil.
Put a few drops of Elmer's Glue into the hole in the middle of
the wheel. Push the dowel through the wheel until it is flush
with the other side of the wheel. Allow it to dry.
Cut off small strips of the aluminum tape. They should be around 1/4"
wide by 1". Begin applying them to the wooden wheel until it
is covered with tape. Also put tape on the first inch of the
dowel from the wooden wheel. It then needs to be smoothed out.
You can use something like a spoon for this. This assembly will
serve as what is called the terminal capacitor or discharge
terminal. The toroid shape works very well for this purpose.
Put a small amount of epoxy into the hole in the plastic disc on
the end of the secondary coil. Push the bottom end of the toroid
assembly into the hole.
Sand the enamel off the last 1/4" of
the free wire on the end of the secondary with the toroid
assembly attached to it. Air wind the wire in a few loose turns
upwards to the toroid. When it contacts the bottom of the toroid,
secure the wire in place with a piece of aluminum tape.
Cost of the Secondary Coil
1. I found the cardboard tube in a trash can at a machine shop's shipping department.
You should also be able to get these inexpensively at office suppliers. The plastic cap
may come with the tube.
2. The varnish costs about $8.00. The brushes cost me $1.00 each.
3. I was able to get my wire for $3.00 a pound in surplus.
Unfortunately, it sold out in less than a week. Kelvin sells wire
24 gauge magnet wire for $9.50 a pound. Unfortunately, there is a
$20.00 minimum order, plus a $6.00 shipping charge.
The Electronic Goldmine occasionally gets ahold of batches of magnet wire, and their
prices are very reasonable for the amount they sell on a roll.
4. The wooden dowel is about $.50. You can get a box from any retailer - all of stheir
products arrive in boxes, which must be opened sometime, right?*
5. The plastic discs can be cut from a sheet of acrylic plastic.
I had to buy one that measured 2 feet by 3 feet,
and it cost $5.00. Maybe you can snag a small scrap of it for free from
a store (ask first though).
6. The copper braid cost $2.00 from American Science and Surplus.
However, if you would like to purchase this, AS&S does have a
$10.00 minimum order, plus shipping.
7. The aluminum tape is available either in the tape section or
the dryer vent and duct section of a hardware store. It costs
about $3.50 for a small roll.